How to Record, Edit, and Upload 360-Degree Videos
August 30, 2016
Get ahead of the curve by learning how to produce 360-degree content for mobile devices and VR headsets. Here are the tools you need to shoot, edit, and upload 360-degree videos.
360-degree videos have now been released to the masses via YouTube and Facebook. Prior to that, you had to have a VR developers kit and share your work with other developers.
Now that any user has the ability to upload and share content, let’s take a look at a few ways you can start producing 360-degree videos.
360-Degree Cameras and Rigs
As this is a developing technology, there are a ton of options available and in development. If you are planning on purchasing a single camera, you should note that only some sites can host your video. Currently, YouTube is only compatible with four camera options; Ricoh Theta, Kodak SP360, Giroptic 360cam, and IC Real Tech Allie.
With these cameras, you are looking to invest $300 – $500.
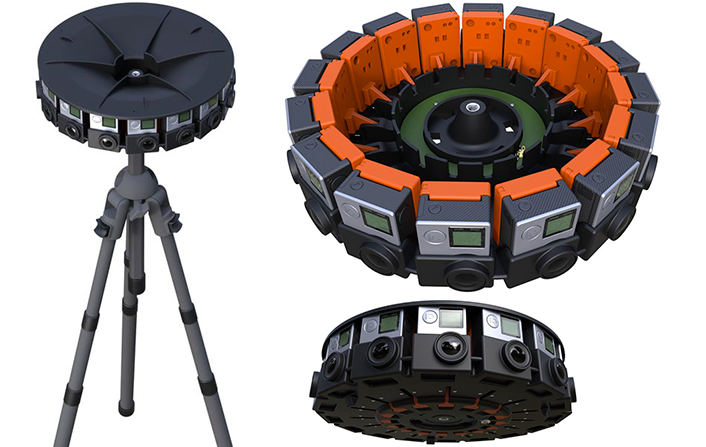
The other option you have is to build your own rig. The most widely used camera rigs use a series of GoPro cameras. The most common rigs feature at least six GoPro cameras in a 3D printed rig. Google Jump uses 16 GoPro cameras.
These rigs will cost thousands of dollars, depending on which GoPro camera you decide to use. The benefit of GoPro is that the cameras are reliable. They have been tested for years in extreme conditions, and they have been designed to be the ultimate camera for any condition.
Here is a quick interview about a team that mounted a rig on an Indy car.
When shooting with one of these cameras or rigs, remember that 360-degrees means everything will be in view — every detail of the room, the camera operator, any equipment, etc. Be sure you take that into account when deciding on a location. You will also need to make sure you have suitable and consistent lighting to make sure all of the footage matches.
Editing 360-Degree Video
One of the most popular 360-degree editing platforms, which is also YouTube compatible, is the Kolor Autopano Video software. The Kolor Autopano Video platform works on both Windows and Mac. It automatically syncs your footage and stitches a 360-degree video. You also have the ability to render in HD, 4K, or even export individual frames.
Here’s how to use the latest version of the software (2.2).
To see what skydiving footage looks like at 360 degrees, check out this Land, Air, and Sea video from GoPro. On desktops, you will need the Chrome browser. You can control the video by using your mouse or the keyboard letters W, A, S, D.
Uploading a 360-Degree Video

Uploading your video is not as easy as clicking upload and waiting. In YouTube, you will need to scrub the video through a 360-degree app. The video needs to include certain metadata for 360-degree playback to be enabled.YouTube has provided the following for all users to upload footage.
Create a 360-enabled file with an app
- Download the 360 Video Metadata app for Mac and Windows
- Un-zip the file, then open the 360 Video Metadata app. If you’re on a Mac, you may need to right-click the app and then click “Open”
- Select the video file
- Click “Inject and save”
- Enter a name for the file that will be created
- Save the file. A new file will be created automatically in the same location as the original file
- Upload the new file to YouTube
- Wait for the 360 degree effect to process. This may take up to an hour.
Create a 360-enabled file with a script
Rather than using an app, you can use a Python script. Here’s how to do that.
- Download the ZIP containing the script using the “Download as ZIP” button at the bottom-right of this page. You’ll need to have Python installed on your computer to run it.
- Un-zip the file. In the 360-Videos-Metadata sub-folder, you’ll see the 360VideosMetadata.py script. From Terminal (Mac) or Command (Windows), run the script with this command:
360videosmetadata.py -i [input] [output]Input is the full filename of the file that you’ve already created, for example 360video.mp4. The output will be the name of the file that will be created by the script, so come up with a new name.
The command you’ll run will look something like:
360VideosMetadata.py -i 360video.mp4 360videoNEW.mp4 - If you’ve never run a Python script before, take a look at these resources for Mac and Windows
- The script will create a new file. Next, you’ll upload it to YouTube.
Before publishing, you can verify that the file has 360-degree playback enabled by checking the video by watching it on your computer. It may take up to an hour for 360-degree playback to be available.
Be sure not to make edits to the video itself using the YouTube Video Editor and Enhancements tools on a desktop or mobile apps, as these tools don’t currently support 360-degree videos.
Similar articles:
Publisher: VRExtasy